Friday, 23 October 2015


Chocolate Bowls - Yummy Edible chocolate bowls:


Chocolate - anyone, like me, can never say 'no' for this.. !!!

Few days ago organised a small party @ home for near and dear ones, So wanted to prepare some special item for kids.

Finally I have decided to prepare these DELICIOUS EDIBLE CHOCOLATE BOWLS and they came out wonderful.


These are made with only one ingredient - "cooking chocolate". 
Initially the process was little messy for me as its learning time. I suggest anyone to wear old clothes or a good fully covering apron for this preparation because if it fails it is going to leave yummy memories on your clothes :-P ;-) ;-)

It is a very quick and easy process and finished item is sooo delicious and yummyyyy...!!!!!!
Everyone at the party were surprised and enjoyed the tasty cups filled with ice cream.. :-) :-)


Intentionally I made few uneven random shapes to give a raw finish..!!!


You comments and suggestions are most welcomed...!!!

Thanks,

Priya


Thursday, 17 September 2015


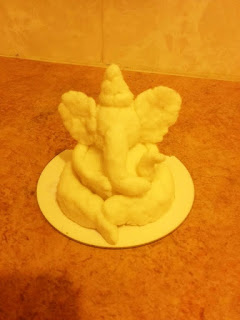
Ganapathi Idol - Handmade Paper Ganesh:


Shri Maha Ganapathiye Namaha..!!! Wish you all a very happy Vinayaka chavithi and may all your wishes fulfill this year..!!!

For the auspicious Vinayaka Chavithi ( Ganesh Chathurthi ) got an idea of making Ganapathi idol on my own, influenced by our school days memories.

Clay molding and paper mache crafts are always fascinating to me and this is the first time I tried paper mache idol, it is very simple and easy to make.. :-) !!!

I have decided to use white paper as the base so that the painting would be much easier, so the best and easiest option for me are the soft tissue papers. It took no time to dissolve and form into mashed texture, then mixed some normal graft glue to form into white paper mache ( I must say paper clay :-P ).

Then starts the fun part... bringing the mache to ganapathi's shape was not that challenging ( as I was assuming ) and in fact first attempt itself gave me a perfect shape.. hurrayyy...!!!

Drying part was much annoying for me as the climate was very cold and even after 48 hours it was not completely dry, so I had to use hand dryers and heater to make the procedure quick.

Final detailing and designs were made using nail polishes which ever were available at home.

I must mention that the cost I spent on this was " 0 ".


Here I close this post wishing you all again a very happy Ganesh chathurthi..!!!

You comments and suggestions are most welcomed...!!!

Thanks, 

Priya.......


Sunday, 26 July 2015

Re-using an old mobile case


Re-using an old mobile case :


Hello everyone, 

I wanted to share how I gave a new look to my Mobile case .. # DIY #handmade with no cost..!!!


Re-purposing the old and unused things at home is always fascinating to me. I know that most us are interested in such ideas as we are grown up watching our elders doing that.

Its really difficult for me to throw away the old things, so I keep thinking how can I recycle or reuse them. In many ways we can re-purpose them like a decorative item, storage purpose, cleaning items.

Recently I bought a mobile case from a leading online shopping website. Unfortunately the item I received was not in a really good condition and due to some reasons I could not return that as well.

So I used it for few months and later it really turned unattractive. As I said it turned unattractive but was totally usable & very strong.

I wanted to give a new look to that old case and the result is really amazing for me.

So here in this post I wanted to share how I transformed my old mobile case to a new look.. !!! :-) :-) :-)


Material Used:


Old mobile case
Glue ( I used basic craft glue from a dollar store , can try even Mod Podge/Fevicol any   glue which dries transparent)
Glitter ( I have selected silver glitter, you can choose as per your idea..)
Paints in Different shades ( I used acrylic and fabric )
Paint brushes ( optional )
Sponge brush to apply glue ( optional )


Procedure:


1. Cleaned out the surface where we need to decorate, then applied a coat of glue.


2. Sprinkled glitter liberally all over the glue without any gaps and let it dry for some time.


3.Once it is almost dry, I used paints to give a polka dot look in different colors.


4. Painted a thin border line in golden yellow shade and left it to dry completely.


5. Once the glitter & paint are completely dry, now its time to give the top securing layer so that the glitter does not fall off.
Mixed glue with few drops of water and applied a liberal top layer with a sponge brush.


6. It took more than 24 hours for drying and the final look was :-D :-D :-D ... !!!


It took around 1-2 hours making time in total excluding drying period, and costed nothing as all the material used are very basic items which we can easily find in our house.

Due to the top glue coat, the surface feels much smoother and glitter doesn't fall off.

It was wonderful making it and using it as well...!!!


Crafting is so much fun..!!!

Priya...